A Custom Text Encoding Generator For Silverlight
Unlike the .NET platform, Silverlight only provides two text encodings out of the box: UTF-8 (UTF8Encoding class) and UTF-16 (UnicodeEncoding class).
Accordingly, if you find yourself in a situation where you need to encode or decode data with another encoding (e.g. iso-8859-1), you’ll have to write your own Encoding class (or delegate the work to a server-side service).
I found myself in this exact situation yesterday, and came up with a little tool which automates the process. The Encoding Generator is a WPF application which takes the name or code page of a well known encoding, and generates source code for a custom Encoding class which compiles under Silverlight.
Current version: 1.0.0, 2010.03.31, requires .NET 3.5 SP1 or higher
(You can subscribe to the RSS feed or follow me on Twitter in order to get notified about updates and bug fixes)
How Does It Work?
Specifying the Encoding
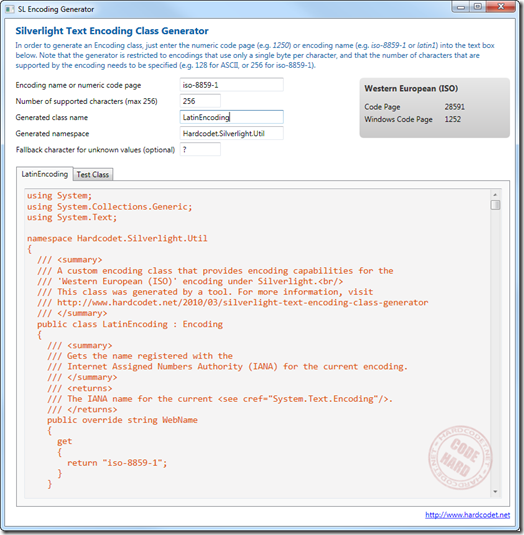
In order to specify the encoding you want to use, you can either enter the name or numeric code page of a well-known encoding. As soon as you enter a valid value, some information for the encoding is being displayed in the right hand border you can see on the screenshot.
As a sample for valid encoding names or code pages, here’s some values you can enter in order to tell the tool to generate an iso-8859-1 encoder (see screenshot):
- iso-8859-1 (name)
- latin1 (name)
- 28591 (code page)
- A list of encodings can be found here.
Fallback Character
The tool gives you the option to specify a fallback character value, which is used as a default in case a character or byte value is being processed during encoding/decoding. In case you don’t specify the character, the encoding class will crash at runtime should it receive data that cannot be properly encoded or decoded.
Single-Byte Encoding Limitation
The generated class only works if a single byte can be translated into a single character and vice versa. Accordingly, if you try to generate code for an encoding that uses several bytes per (e.g. utf-8) character, the generator shows an error message.
Byte Range
You need to specify the byte range of the encoding. For example, ASCII supports only 128 characters, and therefore has a byte range of 128 bytes. Most other encodings support a byte range of 256 bytes, though. 256 is the maximum value that can be specified, as a single byte cannot deliver more values (the byte data type covers a numeric range from 0 – 255).
Testing
The generator also creates an NUnit test class that compares the results of the generated class against the original encoding. Accordingly, this test class is supposed to run in a regular .NET environment, not in Silverlight (if the original encoding that is used in the test was available in SL, you wouldn’t have to generate a custom encoding class in the first place…).
Internals
At runtime, the following is happening: Basically, the generator maintains mapping tables to do the encoding and decoding from characters to bytes and vice versa. Fore every request, it just looks up the translation tables for every supported character/byte value of the encoding.
The generator creates these translation tables on the fly in the form of a static array and dictionary.
Performance
The library doesn’t contain any performance tweaks and performs much slower than the built-in encodings that rely on all sorts of black magic. However, as long as you don’t have to encode or decode huge amounts of data, this shouldn’t be noticeable.
Here’s the results from my machine for 10000 iterations:
- Encoding the whole character table to a byte array (256 characters)
- 17 milliseconds with the built-in encoding
- 94 milliseconds with the generated encoding
- Decoding the bytes back into a string
- 2 milliseconds with the built-in encoding
- 46 milliseconds with the custom encoding


