Tracking Inter-Object Dependencies using Expression Trees (Part 1)

December 28th, 2008

This is the first part of an article that covers the usage of lambda expressions to monitor changes on complex object graphs.

The second part can be found here.
The third part (Lambda Bindings) can be found here.


Latest Version: 1.0.3, 2009.04.03
Download Project: lambda-dependencies.zip

Introduction

In an ongoing project, I had to struggle with quite a few dependencies between objects, mainly with regards to validation. As a result, I came up with a generic solution based on lambda expressions.

But let’s start with an example. Imagine you have an application that references a Student that attends a a given School. And let’s assume, the school’s location (city) is of importance to you, so a changed city should trigger some action. My class model looks like this:

image


In order to keep track of the dependency on the school’s location, you have to observe quite a few things:

  • Whether the City property of the school’s Address object is changed.
  • Whether the Address object of the school itself is replaced by another instance.
  • Whether the referenced School object of the student is changed. This would require you to re-wire change listeners for the school and address.
  • Whether the referenced student instance itself is being replaced by setting the MyStudent property. Again, you would have to deregister all existing listeners and create new ones for the new student, school, and address.


This is a lot of error-prone and tedious work: You need to register and de-register event listeners, handle null references (a new School instance might not provide an Address at first) etc. This is where expression trees come to the rescue. Basically, you can reduce the plumbing to a single line of code:


public MyApplication()
{
  //create a dependency on the city of the student's school
  DependencyNode<string> dependency;
  dependency = DependencyNode.Create(() => MyStudent.School.Address.City);
}


The snippet above analyzes the submitted expression and resolves the dependency graph, which basically looks the following:

image

Dependency.Create returns an object of type DependencyNode. This node refers to the root of the expression tree, which is the MyApplication class that provides the MyStudent property. You can traverse the dependency chain in both directions through  the ChildNode and ParentNode properties should you ever want to. But usually (if at all!), you’ll need just two properties:

  • LeafValue returns the dependency target. In our sample, this is the string that is returned by the City property of the school’s Address.
  • If the school’s Address (or the School reference itself) would be set to null, there would not be a city at all. In this case, LeafValue just returns a value of null. However: You can check whether the graph from root to the dependency target is intact by evaluating the IsChainBroken property on any given node.


//get the city, if the dependency graph leads to a valid address
string city = dependency.IsChainBroken ? "NONE" : dependency.LeafValue;

(Note that LeafValue is a generic property. In this case, it is of type string)

image


Handling Changes in the Dependency Chain

As soon as a dependency is declared, the DependencyNode tries to register event listeners on all objects of the dependency graph in order to track changes and keep itself up-to-date. Furthermore, you can register an event listener with the node’s DependencyChanged event, which fires whenever a change in the dependency chain occurs. Event listeners receive an instance of DependencyChangeEventArgs that provide the changed node, property or field names, and the change reason:

image


Here’s a sample – the snippet below registers an event listener which basically just outputs the name of the student, the school name, and the city to the console:


public MyApplication()
{
  //create a dependency on the city of the student's school
  dependency = DependencyNode.Create(() => MyStudent.School.Address.City);
  dependency.DependencyChanged += OnStudentCityChanged;
}


/// <summary>
/// Invoked whenever the dependency graph between <see cref="MyStudent"/>
/// property and the <see cref="Address.City"/> of the student's
/// school is being changed.
/// </summary>
private void OnStudentCityChanged(object sender, DependencyChangeEventArgs<string> e)
{
  //get the changed node
  DependencyNode<string> changedNode = e.ChangedNode;

  //get student name, if we have one after all
  string studentName = myStudent == null ? "[none]" : myStudent.Name;

  //get the school name
  string school = "[none]";
  if (myStudent != null && myStudent.School != null)
  {
    school = myStudent.School.SchoolName;
  }

  //get the city, if the dependency graph leads to a valid address
  string city = changedNode.IsChainBroken ? "[unavailable]" : changedNode.LeafValue;

  //NOTE: You can also get the leaf value through this convenience method:
  //string city = e.TryGetLeafValue("[unavailable]");

  //write student/city to console
  string msg = "Student {0} goes now to school {1} in {2}";
  Console.Out.WriteLine(msg, studentName, school, city);
}


Once an event listener is registered, you can change properties on different levels of the dependency chain:

public void Test()
{
  //assign a student
  MyStudent = new Student { Name = "Lucy" };
  //set a school without an address
  MyStudent.School = new School {SchoolName = "University"};
  //assign an address
  MyStudent.School.Address = new Address {City = "Redmond"};
  //assign another address instance
  MyStudent.School.Address = new Address {City = "New York"};
  //change the City property of the address
  MyStudent.School.Address.City = "Washington";
  //cut the graph by removing the school reference
  MyStudent.School = null;
  //clear the MyStudent property completely
  MyStudent = null;
}


Every line of the above test method triggers the change event. Accordingly, the console output is the following:

Student Lucy goes now to school [none] in [unavailable]
Student Lucy goes now to school University in [unavailable]
Student Lucy goes now to school University in Redmond
Student Lucy goes now to school University in New York
Student Lucy goes now to school University in Washington
Student Lucy goes now to school [none] in [unavailable]
Student [none] goes now to school [none] in [unavailable]


Enjoy 🙂

kick it on DotNetKicks.com

Author: Categories: C#, Dependencies Tags: ,

IronPython: Reusing Import Symbols to Avoid Performance Hits

December 18th, 2008

I was struggling with IronPython today as I stumbled over a pretty annoying setback when it came to dynamic compilation of scripts that involved namespace imports.

Lets do an artificial sample: The snippet below just increments a variable by one. As expected, it executes blazingly fast – after compilation, it executes a few thousand times without getting over a single millisecond:

value = value + 1


Now look at the following example:

import clr
clr.AddReference('System.Xml')
from System.Xml import *
value = value + 1


Basically, this snippet performs the same logic (incrementing the ‘value’ variable), but it contains an import for the System.Xml namespace. It’s not necessary, but it still needs to be compiled. Executing this (compiled!) script 4000 times takes over 5 seconds!


However: If you are lucky (as me), you have the opportunity to separate namespace imports and business logic, so you basically end up with two scripts:

  • The import script, which is executed only once to get the imported symbols
  • A script that performs the actual work
 
//script 1
import clr
clr.AddReference('System.Xml')
from System.Xml import *

//script 2
value = value + 1


Of course, you still need the import from the first script to perform the second one – which is where symbol dictionaries come into play:

//a dictionary that receives the import simbols
var importSymbols = new SymbolDictionary();

//execute imports on our engine
ScriptSource importSource = engine.CreateScriptSourceFromString(imports,
    SourceCodeKind.Statements);
CompiledCode importCompiled = importSource.Compile();
//create a scop to populate the symbols with the imported types
ScriptScope importScope = engine.CreateScope(importSymbols);
importCompiled.Execute(importScope);


The statement above executes the import script with an empty SymbolDictionary. If you check this dictionary after execution, you can see that it now contains symbols for all types of the imported namespace:

importSymbols.Key = __builtins__
value = IronPython.Runtime.PythonDictionary

importSymbols.Key = clr
value = Microsoft.Scripting.Runtime.Scope

importSymbols.Key = IHasXmlNode
value = IronPython.Runtime.Types.PythonType

importSymbols.Key = IXmlLineInfo
value = IronPython.Runtime.Types.PythonType

importSymbols.Key = IXmlNamespaceResolver
value = IronPython.Runtime.Types.PythonType

... much more


What we can do now is reuse this retrieved symbols for our actual worker snippet  (but beware, there’s a catch):

//compile worker script
ScriptSource scriptSource = engine.CreateScriptSourceFromString(source,
  SourceCodeKind.Statements);
CompiledCode workerScript = scriptSource.Compile();

//creating our scope with the new symbols allows us to access
//the XML namespace
ScriptScope workerScope = engine.CreateScope(importSymbols);
workerScope.SetVariable("value", 10);
workerScript.Execute(workerScope);


However, this code is not thread-safe, because it causes different scopes to actually share not only the import symbols, but all variables through the symbol dictionary. Look at the code below, that creates to script scope instances which are initialized with individual values:

//create a new scope with the symbols of the import scope
ScriptScope run1 = engine.CreateScope(importSymbols);
//start with a value of 10
run1.SetVariable("value", 10);
workerScript.Execute(run1);

//create a second scope with the symbols of the import scope
ScriptScope run2 = engine.CreateScope(importSymbols);
//start with a value of 20
run2.SetVariable("value", 20);
workerScript.Execute(run2);

//both scopes actually share the same variable
Console.Out.WriteLine(run1.GetVariable<int>("value"));
Console.Out.WriteLine(run2.GetVariable<int>("value"));


The console outputs the same value both times – because both scopes operate on the same variable:

21
21


So basically, we have two requirements:

  • Store import symbols (or any other shared variables) in a reusable cache.
  • Store worker variables that belong to a given script scope in another dictionary.


We can do this by subclassing the CustomSymbolDictionary class of the Microsoft.Scripting.Runtime.BaseSymbolDictionary namespace. Took me ages to find a solution, but implementation was a breeze:

/// <summary>
/// A symbol dictionary that provides an fixed set of
/// symbols through a <see cref="SharedScope"/>. As new variables
/// are not added to the <see cref="SharedScope"/>, these cached
/// symbols can be reused across different scopes.
/// </summary>
public class SharedSymbolDictionary : CustomSymbolDictionary
{
  /// <summary>
  /// A script scope that provides a reusable set of symbols.
  /// Any variables that are being created by the <see cref="ScriptScope"/>
  /// that owns this cache are not stored within <see cref="SharedScope"/>,
  /// but the parent scope's own symbol dictionary.
  /// </summary>
  public ScriptScope SharedScope { get; private set; }


  /// <summary>
  /// Creates a new cache instance
  /// </summary>
  /// <param name="sharedScope">A reusable <see cref="ScriptScope"/> that provides
  /// a set of symbols that are supposed to be used across several scopes.</param>
  /// <exception cref="ArgumentNullException">If <paramref name="sharedScope"/>
  /// is a null reference.</exception>
  public SharedSymbolDictionary(ScriptScope sharedScope)
  {
    if (sharedScope == null) throw new ArgumentNullException("sharedScope");
    SharedScope = sharedScope;
  }


  /// <summary>
  /// Invoked if a given variable or symbol is being requested. This method
  /// tries to find the requested item in the underlying <see cref="SharedScope"/>.
  /// </summary>
  /// <param name="key"></param>
  /// <param name="value"></param>
  /// <returns>True if the <see cref="SharedScope"/> provides the requested
  /// symbol.</returns>
  protected override bool TryGetExtraValue(SymbolId key, out object value)
  {
    //return the key from the base scope, if possible.
    lock (SharedScope)
    {
      return SharedScope.TryGetVariable(SymbolTable.IdToString(key), out value);
    }
  }


  /// <summary>
  /// Gets a list of the extra keys that are cached by the the optimized
  /// implementation of the module.
  /// </summary>
  public override SymbolId[] GetExtraKeys()
  {
    lock (SharedScope)
    {
      return SharedScope.GetItems().Select(pair =>
        SymbolTable.StringToId(pair.Key)).ToArray();
    }
  }


  /// <summary>
  /// Tries to set the extra value and return true if the specified key
  /// was found in the list of extra values.<br/>
  /// Any attempts to store extra values are being denied, which causes
  /// them to be stored in the scope itself rather than the local
  /// <see cref="SharedScope"/>. This ensures that runtime variables are
  /// not shared between different instances of the cache.
  /// </summary>
  /// <param name="key">The key that is used to store the submitted
  /// value.</param>
  /// <param name="value">Value to be cached.</param>
  /// <returns>Always false because runtime symbols are not supposed
  /// to be stored within the cache. This causes the value to be stored
  /// within the internal dictionary of the base class.</returns>
  protected override bool TrySetExtraValue(SymbolId key, object value)
  {
    return false;
  }

}


With this implementation, we can change our snippet accordingly:

//create a new scope with the symbols of the import scope
SharedSymbolDictionary cache = new SharedSymbolDictionary(importScope);
ScriptScope run1 = engine.CreateScope(cache);
//start with a value of 10
run1.SetVariable("value", 10);
workerScript.Execute(run1);

//create a second scope with the symbols of the import scope
cache = new SharedSymbolDictionary(importScope);
ScriptScope run2 = engine.CreateScope(cache);
//start with a value of 20
run2.SetVariable("value", 20);
workerScript.Execute(run2);

//both scopes actually share the same variable
Console.Out.WriteLine(run1.GetVariable<int>("value"));
Console.Out.WriteLine(run2.GetVariable<int>("value"));
 
As the SharedSymbolDictionary class stores the value variable not in the shared importScope, the variables of the worker scope can be set independently, which produces the correct output:
 
11
21


And the performance gain is remarkable: Execution time is once again down to 17 milliseconds for 10’000 iterations 🙂

Download cache implementation and test script: symbolcache.zip

Author: Categories: C#, Open Source Tags:

Using a Post-Build Script to set the InstallLocation property in VS Setup Projects

December 14th, 2008

If you check the registry for (un-)installation information about installed applications, you can notice that the InstallLocation registry key is mostly empty. This is because most installers do not set ARPINSTALLLOCATION property to the value of [TARGETDIR] during installation. Unfortunately, this also includes Visual Studio setup projects:

image


What we can do so solve this problem is inserting a simple Type 51 Custom Action into the installer. What I was looking for, was an easy solution to automate this tasks (rather than editing them with ORCA or any other tool), and I eventually came up with a post-build event that updates the MSI database directly. Fortunately, I had a similar script in place from an earlier setup, so adjusting it was quite easy 🙂


In the link below, you can find a VBS script (SetArpInstallLocation.vbs) that inserts the required custom action for you and makes sure the ARPINSTALLLOCATION property is set during installation. All you have to do is calling the script during the post-build event of your setup project.

In the sample below, the script file has been placed in the same folder as the installation project. Accordingly, the build action looks like this:

"$(ProjectDir)SetArpInstallLocation.vbs" "$(BuiltOuputPath)"


image


If the installer file is re-built with this script in place,  the installer writes the InstallLocation properly to the registry during installation 😀

image


Download VBS script file: SetArpInstallLocation.vbs

Author: Categories: .NET, Deployment Tags: ,

Organizing Heterogeneous Data on a WPF TreeView

December 11th, 2008

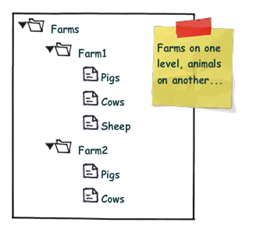
Most WPF TreeView samples you see on the web are somewhat simplistic: While they may provide heterogeneous data, usually all childs of a given node are of the same type:

simpletree

However, more often than not, you’re running into more complex scenarios where additional structuring is necessary. Image your Farm class looks like this:

image

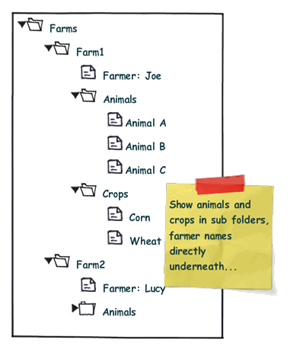
Accordingly, you might want to display that information according to the sketch below:

complextree

Note the difference: We want to organize the Animals and Crops collections within individual sub folders, while the "Farmer" node is a direct child of the "Farm" root node. From the control’s point of view, this means that the "Folder" nodes and the "Farmer" node are siblings.

Now, one solution to that very problem are ViewModel wrapper classes that optimize the business logic for your specific UI logic. This route does work very well for quite a few scenarios. However, sometimes, you just want to have a quick solution. I’ll try to provide one here…

My solution to that very problem requires the following ingredients:

  • A MultiBinding that allows you to combine different bindings.
  • A converter that helps us organizing the different bound collections into sub folders, where necessary.
  • And of course: Data templates that provide a visual representation of your bound data.


Let’s start with the bindings, which are declared within a HiearchicalDataTemplate. You can use a MultiBinding to retrieve all necessary data of a given Farm instance:


<HierarchicalDataTemplate DataType="{x:Type local:Farm}">

  <!-- bind the different data sources -->
  <HierarchicalDataTemplate.ItemsSource>
    <MultiBinding>
      <Binding Path="Farmer" />
      <Binding Path="Animals" />
      <Binding Path="Crops" />
    </MultiBinding>
  </HierarchicalDataTemplate.ItemsSource>

  <TextBlock Text="{Binding Path=FarmName}" />

</HierarchicalDataTemplate>


A MultiBinding always needs a converter of type IMultiValueConverter. Our converter has to provide the following functionality:

  • Allow binding of simple objects (Farmer), or collections (Animals, Crops).
  • Where necessary, put a bound child item or collection into a virtual container object that can serve as a "folder" when it comes to rendering.
  • Provide means to name (or even identify) a folder in order to simplify styling.
  • Render specific child items directly under the parent node (no subfolder). 
  • Return everything as a an object that can be bound to the TreeView.ItemsSource property.


I wrote a simple converter that performs these tasks. The initial declaration looks like this:

 
<MultiBinding Converter="{StaticResource folderConverter}">
  <Binding Path="Farmer" />
  <Binding Path="Animals" />
  <Binding Path="Crops" />
</MultiBinding>
 
…and it produces the following output:

image


Obviously, the data is being parsed parsed and assigned to the "Farm" nodes, but we’re still lacking the desired structure (sub folders for animals and plants). However, this can easily be done by setting the ConverterParameter property:


<MultiBinding Converter="{StaticResource folderConverter}"
              ConverterParameter=", Animals, Cultivated Plants">
  <Binding Path="Farmer" />
  <Binding Path="Animals" />
  <Binding Path="Crops" />
</MultiBinding>
 

The converter parameter allows you to define folders for any of the items that are bound within the MultiBinding, while an empty string inserts a bound item directly under the root item. The converter parameter above produces the following output:

 image


The tree now renders the farmers and four FolderItem instances. FolderItem is a very simple helper class that is used by the converter to store the bound Animals and Crops collections. It provides just two properties:

  • Name (the string that was defined through the converter parameter)
  • Items (the folder’s contents)

Currently, the tree does not know yet how to render a FolderItem class, which is why there’s just the name displayed. What’s missing here is an additional data template for FolderItem:


<!-- data template for FolderItem instances -->
<HierarchicalDataTemplate DataType="{x:Type vm:FolderItem}"
                          ItemsSource="{Binding Path=Items}">

  <TextBlock Text="{Binding Path=Name}" />

</HierarchicalDataTemplate>


This finally produces our desired output:

image


Simply delegating data organization to the SimpleFolderConverter allows us to individually structure heterogeneous data for our TreeView control with a very simplistic approach. Below is the complete XAML for the sample:


<Window
  x:Class="Hardcodet.Farms.Window1"
  xmlns="http://schemas.microsoft.com/winfx/2006/xaml/presentation"
  xmlns:x="http://schemas.microsoft.com/winfx/2006/xaml"
  xmlns:vm="clr-namespace:Hardcodet.Farms.ViewModel"
  xmlns:local="clr-namespace:Hardcodet.Farms.Model"
  Title="Window1"
  Height="300"
  Width="300">

  <Window.Resources>
    <vm:SimpleFolderConverter x:Key="folderConverter" />

    <!-- data template for Farm instances -->
    <HierarchicalDataTemplate DataType="{x:Type local:Farm}">

      <!-- bind the different data sources -->
      <HierarchicalDataTemplate.ItemsSource>
        <MultiBinding Converter="{StaticResource folderConverter}" 
                      ConverterParameter=", Animals, Cultivated Plants">
          <Binding Path="Farmer" />
          <Binding Path="Animals" />
          <Binding Path="Crops" />
        </MultiBinding>
      </HierarchicalDataTemplate.ItemsSource>

      <TextBlock Text="{Binding Path=FarmName}" />
    </HierarchicalDataTemplate>


    <!-- data template for FolderItem instances -->
    <HierarchicalDataTemplate DataType="{x:Type vm:FolderItem}"
                              ItemsSource="{Binding Path=Items}">
      <TextBlock Text="{Binding Path=Name}" />
    </HierarchicalDataTemplate>

  </Window.Resources>

  <!-- the treeview control -->
  <TreeView x:Name="farmsTree" />
  
</Window>


Of course, you can easily style any of the data templates to your liking. You find the complete sample under the link below. Enjoy 🙂

Download Sample Project (VS2008): farmtree.zip

Author: Categories: WPF, WPF TreeView Tags: ,

Putting the Fun back to Sketching: Balsamiq

December 8th, 2008

Ayende wrote about it and I felt I just have to spread the word: balsamiq is GREAT! I played around with the tool for about 10 minutes and then had to have it. Below is my first sketch with the tool – this is about 20 minutes work:

balsamiq

Love it 😀

Author: Categories: Tools, Uncategorized Tags:

A Covariant ObservableCollection for .NET 3.x

November 28th, 2008

When starting with generics, I was somewhat suprised that something like this didn’t work:


public interface IAnimal
{
}

public class Pig : IAnimal
{
}

public class AnimalFarm
{
  private ObservableCollection<Pig> pigs;

  public IEnumerable<IAnimal> Animals
  {
    get { return pigs; } //DOES NOT COMPILE
  }
}


The problem is that generics aren’t covariant, which is sometimes a bit of a problem when working with interfaces. However, while we’re waiting for C# 4.0, there is a poor man’s solution to covariance – the idea is to just expose the required IEnumerable<IAnimal> interface explicitly for the interface. And of course, there’s a generic solution to that problem:


/// <summary>
/// An implementation of <see cref="ObservableCollection{T}"/> that provides
/// an <see cref="IEnumerable{X}"/> interface for a super type of
/// <typeparamref name="T"/>.
/// </summary>
/// <typeparam name="T">The type of items to be stored in the collection.</typeparam>
/// <typeparam name="X">A super type of <typeparamref name="X"/>, for which this
/// collection provides an <see cref="IEnumerable{X}"/> interface, thus providing
/// covariance.</typeparam>
public class HybridObservableCollection<T, X> : ObservableCollection<T>,
                                                IEnumerable<X> where T : X
{

  /// <summary>
  /// Provides enumeration over type <see cref="X"/>.
  /// </summary>
  /// <returns>A <see cref="IEnumerator{X}"/>> that can be used to iterate
  /// through the collection.</returns>
  IEnumerator<X> IEnumerable<X>.GetEnumerator()
  {
    foreach (T t in this)
    {
      yield return t;
    }
  }

}


Note the type constraint: The second type parameter (X) must be convertible to the first one (T), which ensures that you can’t break the collection.

And as a result, we can return the collection as both IEnumerable<Pig> or IEnumerable<IAnimal>:

public class AnimalFarm
{
  //the collection provides both IEnumerable<Pig>, IEnumerable<IAnimal>
  private HybridObservableCollection<Pig, IAnimal> pigs;

  public IEnumerable<IAnimal> Animals
  {
    get { return pigs; } //WORKS
  }

  public IEnumerable<Pig> Pigs
  {
    get { return pigs; } //WORKS TOO
  }
}


Of course, rather than just IEnumerable<IAnimal>, you could easily expose IList<IAnimal> that way, but you would risk runtime exceptions if somebody tried to inject another IAnimal implementation into the base class that is not an instance of type Pig. However, in a safe environment, this might be well feasible if it lets you expose your collections as lists and still stick to interfaces.

Author: Categories: C#, Uncategorized, WPF Tags: